• Contact Us
  • Select a Location
    Close Location Selection

    Current Location:

    Let us know the location you'd like to browse.

    Select a Location
    OR

Configuring Technicolor CGA4131 WiFi Settings

Solution

The following table provides details on the WiFi settings options that are available in the Technicolor CGA4131 administrative portal. Click Save after making any changes to your WiFi settings.
 

Option Description
Wireless Interface Enables or disables the wireless interface.
Network Name
  • You can select to set or display your network name.
  • Select Hide to prevent your network name from displaying to other devices.

    Note: Enabling your network name does not allow devices to connect to your Gateway network. Users must provide the wireless network key or password to connect to your Gateway network.
Network Mode
  • Determines which 802.11 wireless protocols are used.
  • Different options are available according to the wireless interface you are using.
Channel Width The channel bandwidth can be selected manually for Wireless-N connections.
Channel For optimal performance in a network using Wireless-N, Wireless-G, and Wireless-B devices, select the AUTO (20 or 40 MHz) channel setting.

Important: All devices in the wireless network must broadcast on the same channel to communicate.
MAC Address Displays the wireless MAC address.
Scan Provides statistics on neighboring access points.
1

Open a web browser and enter http://192.168.0.1.

2

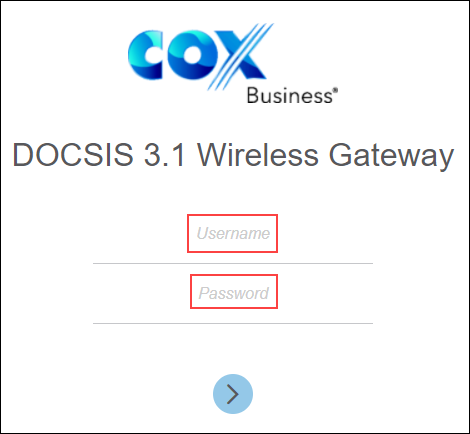
Enter your username and password.

Note: If this is your first time accessing the administrative portal, then you will need to leave the username and password fields blank.

image of the administrative portal login page

3

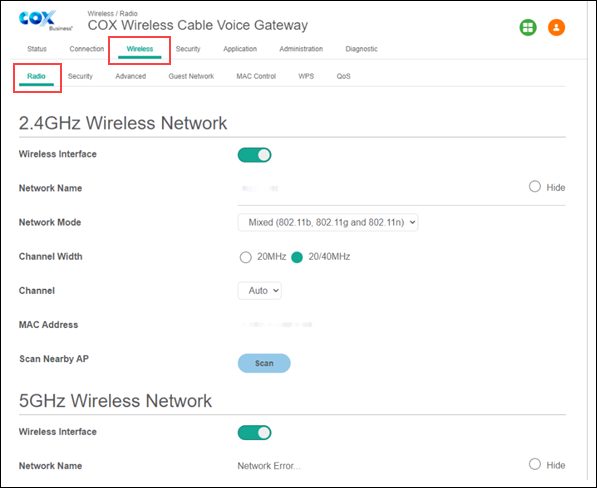
From the administrative portal, click the Wireless tab, then click the Radio sub-tab.

Image of the technicolor 4131 admin portal

Result: The screen displays setup information for your 2.4 GHz and 5 GHz wireless networks.

4

Which WiFi settings do you want to change?

  • If Primary SSID, then continue to the next step.
  • If Guest SSID, then proceed to step 8.
5

From the Gateway admin portal, click on the Wireless tab.

  1. From the Wireless section, click on the Radio tab.
  2. Which band(s) do you want to use for your private SSID?
  3. To have the Internet Gateway automatically select a band and optimize your connection use band steering. See Band Steering Features and Benefits.
  4. To use the 2.4 GHz band, under the 2.4GHz Wireless Network section, click the Wireless Interface switch On.
  5. To use the 5 GHz band, under the 5GHz Wireless Network section, click the Wireless Interface switch On.

    Note: The primary differences between the 2.4 GHz and 5 GHz wireless frequencies are range (distance) and bandwidth (speed).
    • 5 GHz provides faster internet at a shorter distance, whereas 2.4 GHz offers coverage for farther distances, but may perform at slower speeds.
    • If you think about 5 GHz like a highway, it’s like having more lanes and less traffic on the highway – so you can go faster!
    • Ensure that devices such as tablets, smartphones or laptops can read the 5 GHz network. If the device is dual band-capable, you should see two SSID / Network names; one labeled 2.4 or 2.4 GHz, and another labeled 5G or 5 GHz.
    • If the devices can take advantage of this, use 5 GHz in close proximity to your WiFi modem or router. If you are far from your WiFi modem or router, 2.4 GHz is recommended.
    • If you are renaming your network SSID, make sure to select a different and unique name for each WiFi network that helps you clearly identify both the 2.4 GHz and the 5 GHz network.
    • For information on band steering, see band steering.

  6. In the Network Name field, enter the new SSID name.
  7. Click Save.
6

Complete the following steps.

  1. From the Gateway, click the Wireless tab.
  2. In the Wireless section, click the Security tab.
7

From the Security tab, complete the following steps to change the WiFi password.

  1. From the Security Mode drop-down menu, select Open (risky), WPA2 Personal, or WPA or WPA2 Personal. See Ways to Secure Your Wireless Network.
    • If selecting Open (risky), then no password is required, so click Save. All steps complete.
    • If selecting WPA or WPA2 options, then continue to the next step.
  2. From the Encryption drop-down menu, select AES/TKIP.
  3. In the Network Password field, enter the new WiFi password.
    • The WiFi password must be between 8 and 63 characters in length.
    • The WiFi password may contain numbers, letters, and special characters.
    • See Cox Password Requirements
  4. Click Save.
8

From the Gateway admin portal, click on the Wireless tab.

  1. From the Wireless section, click the Guest Network tab.
  2. In the Wireless drop-down menu, select either 2.4GHz or 5GHz.
  3. In the Network Name field, enter the guest SSID name.
  4. Click Save.
9

From the Guest Network tab, complete the following steps to change the guest WiFi password.

  1. From the Network Name (SSID) field, select the Broadcast and Enable radio buttons.
  2. In the Guest LAN Settings section, from the Security Mode drop-down menu, select Open (risky), WPA2 Personal, or WPA or WPA2 Personal. See Ways to Secure Your Wireless Network.
    • If selecting Open (risky), then no password is required, click Save. All steps complete.
    • If selecting WPA or WPA2 options, then continue to the next step.

    Note: If you want to hide the SSID, then the SSID can be enabled and utilized when not broadcasting.
     
  3. From the Encryption drop-down menu, select AES/TKIP.
  4. From Guest Network Settings, in the Network Password field, enter the guest WiFi password.
  5. Click Save Settings.
New MyAccount

Cox Business MyAccount Updates

With the new and improved MyAccount portal from Cox Business, you’re in control. Included with your Cox Business services, it’s all right at your fingertips anytime, anywhere. 


  • Perform a health check on your services and reset your equipment
  • Easily configure key features and settings like voicemail and call forwarding
  • View your balance and schedule payments

Search Cox Business Support

Didn't Find What You Were Looking For? Search Here.