Access your Security Solutions system through MyAccount, see Accessing Your Security Solutions System Through MyAccount.
Creating a Group User for Multi-System Security Dashboard Using MyAccount
Solution
Click the Location options and select the appropriate group.
Click Users.
Click Add New User.
On the New User screen, complete the following steps.
- Enter the user's First Name.
- Enter the user's Last Name.
- Click Create.
From the Device Access screen, complete the following steps.
- In the ACCESS CODE field, set up the code that the user will use to access the panel or touchscreen. You can enter a specific code, or click GENERATE CODE to create a randomly generated code.
- Click Save.
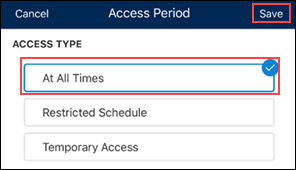
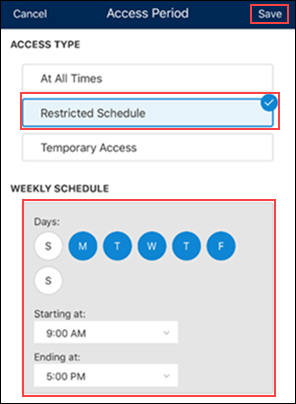
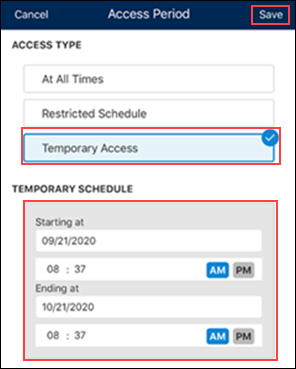
View the table below for steps on selecting the appropriate ACCESS TYPE for the user.
| Access Type | Description | Steps |
|---|---|---|
| At All Times | Access with no restrictions |
 |
| Restricted Schedule | Access with days and times |
 |
| Temporary Access | Access for a limited time |
 |
In the Access Type field, select the desired type of access for the user.
- Existing + Future: Grants access to all devices in all locations across all groups and automatically grants access to future devices, locations, and groups.
- All Existing Devices: Grants the user access to all currently existing devices, locations, and groups.
- Set By Location: Allows you to select the desired access based on location.
- No Device Access: Restricts access to all devices on all locations within any group.
Click Save.
The user code is sent to the panels at the selected locations to allow the user access.
- Wait 5 minutes before testing the code at the panel.
- The duration that it takes to push codes to the panel depends on the number of locations that need to be updated.
Do not make changes to the panel or send other remote commands during this time as this could result in codes not syncing properly.

Cox Business MyAccount Updates
Cox Business MyAccount Updates
With the new and improved MyAccount portal from Cox Business, you’re in control. Included with your Cox Business services, it’s all right at your fingertips anytime, anywhere.
- Perform a health check on your services and reset your equipment
- Easily configure key features and settings like voicemail and call forwarding
- View your balance and schedule payments
Search Cox Business Support
Search Cox Business Support
Didn't Find What You Were Looking For? Search Here.