• Contact Us
  • Select a Location
    Close Location Selection

    Current Location:

    Let us know the location you'd like to browse.

    Select a Location
    OR

Activating Microsoft Teams Integration With IP Centrex

Details

  Image of Cox Business banner

This Cox Business MyAccount view is only available as a pilot for customers in Las Vegas.

Cox Business IP Centrex customers use Microsoft Teams to place and receive calls from their devices and software client. Ensure the customer has the following prerequisites prior to beginning the activation process.

  • The account has one of the following active Cox Business IP Centrex packages
    • Professional
    • Complete
    • Select
  • Service code HXMSTMS is on the account
  • Installed Microsoft Teams licensing for each user
  • Ordered Microsoft Teams Integration for each user and the primary administrator
  • Received the activation email and clicked the Accept Invitation link.
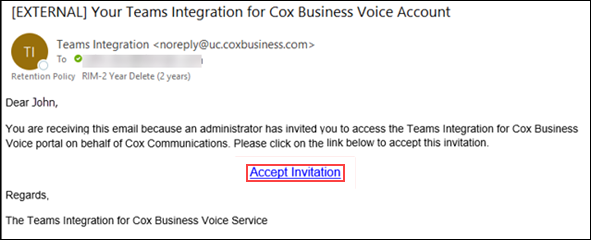
    Image of Invitation Email

    Note: The email is valid for four days. If the email was not received or the email expired, see the Resending Invitation Email tab.

  • Have Teams global administrator credentials and administrative privileges online. If they do not have Teams global access with admin credentials, then they need to contact their Teams integrator for support.
  • Cox Business online credentials.
  • Disabled all pop-up blockers in a modern Internet browser.

Has the customer met all of the prerequisites?

  • If yes, then continue to the activation steps.
  • If no, advise the customer to complete the items before activating Microsoft Teams.
1

Go to myaccount-business.cox.com, enter your User ID and Password, and then click Sign In.
 

Note: If you have not created an online profile with a User ID and Password, refer to Setting Up Your Online Profile.

2

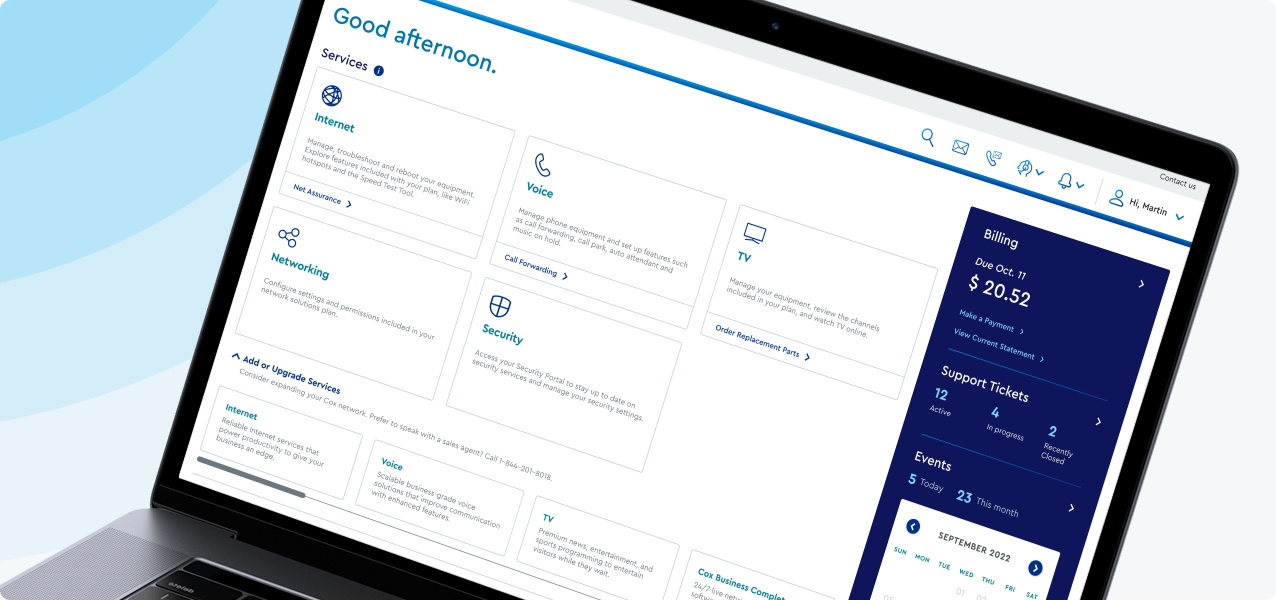
From the Services section, click the Voice icon.
 

image of Online Dashboard Voice Icon

3

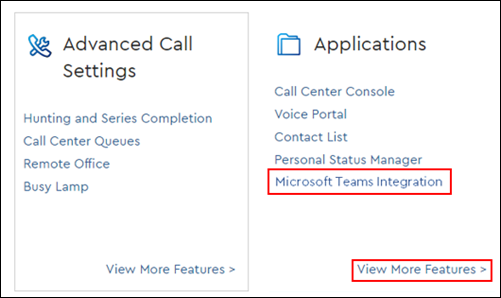
Scroll to the Applications category and click the Microsoft Teams Integration link.

Note: If the Microsoft Teams Integration link is not displayed, click the View More Features link.

Image of Voice Tools Applications section

Result: The Integration Portal displays. To integrate your IP Centrex numbers with Microsoft Teams, click on the Activating With Teams tab and follow the steps provided.

To assist a Cox Business IP Centrex customer with resending the Microsoft Teams Integration email, advise the customer to complete the following steps.

1

Go to myaccount-business.cox.com, enter your User ID and Password, and then click Sign In.
 

Note: If you have not created an online profile with a User ID and Password, refer to Setting Up Your Online Profile.

2

From the Services section, click the Voice icon.
 

image of Online Dashboard Voice Icon

3

Scroll to the Applications category and click the Microsoft Teams Integration link.

Note: If the Microsoft Teams Integration link is not displayed, click the View More Features link.

4

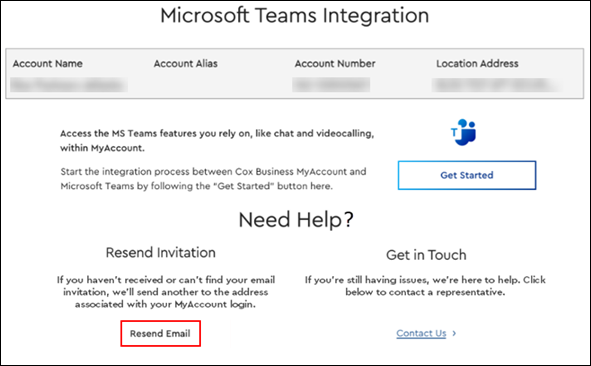
From the Microsoft Teams Integration home page, scroll down to the Need Help? section. Under Resend invitation, click Resend Email.

Image of Resend Email link

5

When the customer receives the invitation email from Cox Business, click the Accept Invitation link.

Image of Invitation Email

Result: They will be prompted to re-enter their Microsoft Teams username and password.

6

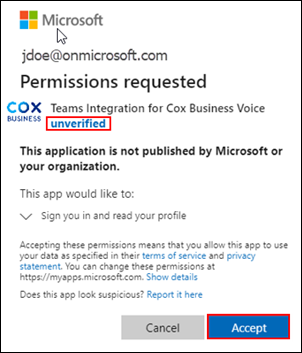
If this is their first login, for security reasons they will also receive a Permission request.

Image of Microsoft Permissions

Click the Accept button to continue to the Teams Integration portal.

From the Cox Integration portal, the customer activates the IP Centrex phone numbers with Microsoft Teams by completing the following steps.

1

From the Cox Integration portal, click the Accounts tab on the top navigation bar to display the top-level parent account. Click the Customer Portal link to display the Users section of the child account page.

Image of Customer Portal link

2

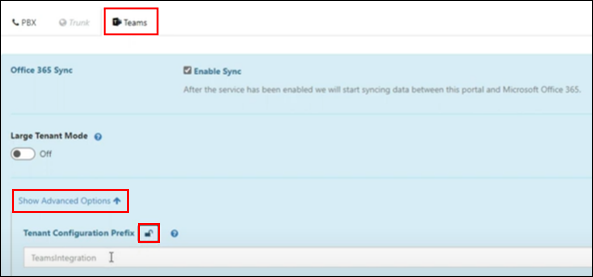
Create the Tenant Configuration Prefix, unique names for each one of the child accounts, by following the steps below.

  1. Click the Services link in the top toolbar.
  2. Click the Teams tab on the top navigation bar.
  3. Click the Show Advanced Options link.
  4. Click the padlock icon at the right of the Tenant Configuration Prefix link to open the padlock.

Image of Teams page Configuration Prefix

3

Complete the Tenant Configuration Prefix using the steps below.

  1. In the Tenant Configuration Prefix field enter a unique name for your site.

    Example
    : Use your company name followed by a unique site name. The field requires alphabetical characters only, no spaces or numbers.

  2. Click the Enable Service button.

    Image of Prefix field and Enable Service button
     
  3. From the pop-up Sign in window, enter your Microsoft Teams' global admin credentials. Click Next.
  4. From the Enter Password pop-up window, enter your password and click Sign In.

    Note: Global Administrators may have multi-factor authentication enabled, and will be prompted to validate their login.
     
4

The platform will sync automatically to Microsoft. If syncing is delayed, click the Sync Now – Changes Queued button.

Image of Sync Now - Changes Queued

Result: The Teams integration portal will now retrieve Teams users from Microsoft. The Portal will display status information while the platform syncs—which takes 15 minutes or longer depending on the size of the activation.

When syncing completes, a Sync Now button displays.

Image of Sync Now message

5

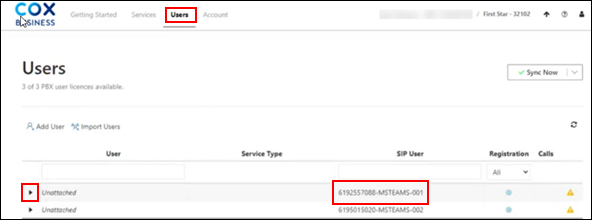
Complete the following steps to associate a User with a phone number.

  1. Click the Users link in the top toolbar.
  2. In the SIP User column, click the desired 10-digit phone number.
  3. In the left-hand side column, click the arrow associated with that phone number to expand the field.

    Image of Users window
     
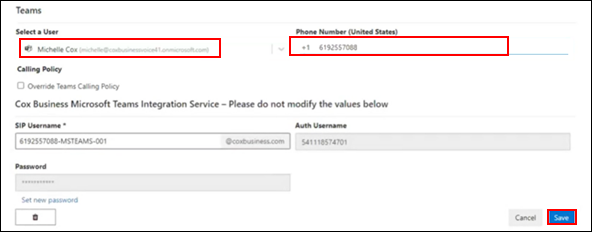
  4. From the drop-down menu, select a User that you want to associate with a Cox Voice number.
  5. Enter this User's 10-digit phone number in the Phone Number field next to the Teams User Name.
  6. Scroll down and click the Save button on the bottom right.

    Image of associate user with phone number

  7. Repeat the steps above for each user. Scroll down to locate another unattached user at the bottom of the screen and continue to associate users and phone numbers.
6

When all users have been associated and saved, click the Sync Now – Changes Queued button.

  • During the sync, you may be prompted to enter the Teams Global Admin Username.
  • The system will integrate the Cox telephone numbers to the Teams users.
  • The portal will complete the user setup during the processing and it can take 15 minutes or more.
  • After syncing, you may need to refresh the screen to complete this step.
7

To verify the user has been successfully configured, complete the following steps.

  1. Confirm the radio button in the Registration column is green.
  2. When synchronization is complete, the system is ready and the user will see a phone icon in their Teams client.
  3. Click the phone icon to open the dial pad.
8

Test outbound calling from Teams, enter a phone number in the dial pad, and click the Call button.

9

Test an inbound call to Teams from a mobile device. Place a call to an integrated Cox telephone number.

Result: The call will ring the Teams client and any IP Centrex phones or devices. When calls are successfully placed and received, activation is complete.

New MyAccount

Cox Business MyAccount Updates

With the new and improved MyAccount portal from Cox Business, you’re in control. Included with your Cox Business services, it’s all right at your fingertips anytime, anywhere. 


  • Perform a health check on your services and reset your equipment
  • Easily configure key features and settings like voicemail and call forwarding
  • View your balance and schedule payments

Search Cox Business Support

Didn't Find What You Were Looking For? Search Here.